Reducing ad weight with TinyPNG’s online compression tool

In my last article, I wrote about how you can save a lot of “weight” (in kilobytes) by using “hosted libraries”. Indeed, there are other ways to save a few kilobytes, and I always say: it might save lives! I keep hearing from my clients something like “can we do that with only 150 KBs?” – because that’s the magic limit for standard banners on most ad servers, like Doubleclick, Sizmek or Adform. Everything that exceeds this weight costs more, but is usually not planned in the budget of the media agencies. The magic word is “compression”!
 
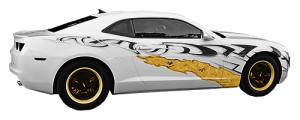
Usually, it might be no problem not to compress images you are using on your ads, but as soon as you start having a bigger amount of assets (example, car diving into the ad on my last article or if you need your buffer for other stuff, like to embed your own fonts), then it might be a hard bite to keep the banner within the weight boundaries!
 
With Photoshop there is the possibility to save PNGs and JPGs with the setting “Save for Web”, one can adjust the compression level of JPGs. This is not the case with PNGs though and the PNGs saved from Photoshop will be “losless”, which means the image isn’t compressed and has a high file weight.
 
The sweet panda from TinyPNG https://tinypng.com gives you the chance to drag’n’drop the uncompressed JPGs and PNGs to upload them – which are then optimized on their server and can be downloaded directly as a single file or ZIP package or even stored directly to your Dropbox. Note the limit of 20 images per batch. Of course, you can start several batches after the other if you have a higher amount images (just as if you have to compress a whole bunch of ads).
 

Results of the compresson:

 
results of the optimisation

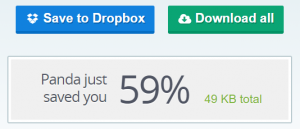
Overview of the saved kilobytes + dropbox/download buttons – ©TinyPNG

 
Also helpful in case you have a whole bunch of images to kompress is the Photoshop plug-in: https://tinypng.com/photoshop, which is available for 50 Dollars. In my opinion a very good investment for people like me, who constantly have to compress tons of images to reduce the weight of the banner.
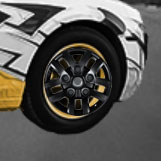
 

PNG comparison:

 
uncompressed image compressed image

Left uncompressed image with 82 KBs, right compressed image with 33 KBs. In my opinion, there is hardly a difference to be seen – ©Pixabay

 
With the plugin you can use the excellent compression directly from Photoshop when saving the assets – but even better is the possibility to use the “batch compression”, if you have to optimize several files. To do this, select a local folder on the computer and apply the optimization in all PNGs and JPGs in it, also in all subfolders! So you can produce the entire project including format adaptations “as usual” and let the compression run over the entire folder when you are ready. I still recommend to have a backup copy of the uncompressed images, just in case!
 
So as you can see, you can meet the agency’s demand for a small amount of data by reducing the size of the images with a tool like TinyPNG.
 
I hope to have helped with these words, if you have any questions and suggestions on this topic, please write them down in the comments! : -)

Using “hosted libraries” in ads running over adservers

Today I will be writing about the use of “hosted libraries”, ie the externally hosted resources (like the TweenMax used on my last article ) in banners. Usually we are quite limited in the production of standard ad in terms of the “weight” of the banner (ie the amount of data, typically measured in kilobytes). Every ad is shown many thousands of times, and of course all the data has to be transferred every time so that the amount of data we may use is limited by publishers and it is no wonder we are really happy about every bit of KB we can save on the production when it comes to their restrictions!
 
So it helps if we don’t have to deliver scripts like TweenMax “physically” within the ads or upload them to the adserver/marketer. Fortunately, we can take advantage of the scripts from various content delivery networks (CDNs), which we load in the head tag of our ads (they are for free, of course):
 

HTML inside Head:

<script src="https://cdnjs.cloudflare.com/ajax/libs/gsap/latest/TweenMax.min.js"> 
</script>

 
Usually you will find CDN links to mostly every scripts, such as Jquery, CreateJS, AdobeEdge etc.

 
It is important to always use a Secure connection, so the script should be loaded from a https:// source , otherwise the publishers may knock on your door with complaints. 🙂
 
I hope to have helped with this article and feel free to comment or write down any questions!

Spinning car wheels HTML5 ad animation with TweenMax

The automotive industry is certainly one of the industries that invest the most in online ads, every day I see countless advertisements from different car brands. Almost every new car model can be found on the Web. Within the abundance of ads it is not exactly easy to create a unique and catchy ad for the client, so every bit to make it more interesting is welcome! Here I will show how to use HTML5, Javascript, CSS and TweenMax to create a nice animation that looks nice on the ads and makes it more catchy and realistic.
 
In my opinion, a very good visual trick is to let car to drive into the viewport – a requirement that was often made my clients. After all, driving is exactly what cars should do and thus provides a direct link to the benefits and inspiration we want the customer to feel. Only the car driving in isn’t necessarily enough, it should also look reasonably realistic. The spinning of the car tires or rims plays an important role (otherwise the car would practically “float” over the ground).
 
Here I would like to describe how the following animation was created:


For the animation we create two <div> elements, an element that contains the rim and a parent element. It is important to have two <div>’s here because we want to rotate the tire/rim, but we still need to adjust the angle so that it fits the car image perfectly. It is also helpful to put both tires in a container together with the car image, so that you can move all elements together when animating the parent container.
 
It is important to have an image of the car with a transparent background and a good frontal image of the tire or the rim (ask your customer, they will certainly be able to help you) 🙂
 
Front view of the wheelsCar image with transparent background

Images of car itself and its wheel with transparent background – ©Pixabay

And here comes the essential part: first we integrate the images into the HTML:

HTML


<div id="autoContainer">
    <div id="reifen1">
        <img src="assets/felge.png" id="felge1">
    </div>
    <div id="reifen2">
        <img src="assets/felge.png" id="felge2">
    </div>
    <img src="assets/auto.png" id="auto">
</div>

 
Then we add the CSS for the wheels:
 

CSS

#reifen1 {
    position: absolute;
    left: 415px;
    top: 158px;
    z-index: 11;
    transform: rotateY(-33deg) skewX(-7deg);
    -webkit-transform: rotateY(-33deg) skewX(-7deg);
    -moz-transform: rotateY(-33deg) skewX(-7deg);
}

#felge1 {
    height: 45px;
    width: auto;
}

 
As you can see above, we specified a skew/inclination of the element #reifen1 to match the angle of the tires in the car image. Without this skew, the whole thing would look like in the picture below and would “wobble” while rotating:
 
right wheel angle wrong wheel angle

(left: wrong angle, right: correct angle)

 
Now we just have to rotate the #felge1 element. For this I like to use TweenMax with a code snippet that makes the #felge1 rotate endlessly. The second snippet makes sure that the timeScale of the tweens is set to 0, so that the tires slowly decelerate towards the end of the animation, when the car is supposed to stop.
 

Javascript

function startReifen() {
    reifenTween= new TweenMax("#felge1, #felge2", 0.25, {
        rotation: '-=360_cw',
        ease: Linear.easeNone,
        repeat: -1
    });

    TweenMax.to(reifenTween, 1.0, { 
        timeScale: 0, 
        delay: 1.1, 
        ease: Back.easeOut.config(0.6) 
    });
    return reifenTween;
}

 
You can play with all parameters until you have found the best result for your individual need. For example, you can rotate the wheels in the other direction with rotation: ‘+= 360_cw’ or change the length or delay of the animation. Anyway, this is a good approach for a realistic and cheerful animation.
 
I hope to have helped with this post! Please leave your Questions and criticism in the comments, I will be happy to get back to you!